Akka Rest Service Example Java
Building a fully functional REST service using Akka actors
Akka is an open source project built by Lightbend, it provides a simpler, single programming model — one way of coding for concurrent and distributed applications — the actor programming model.
Akka's primary goal is to make it simpler to build applications that are deployed in the cloud or run on devices with many cores that efficiently leverage on the computing power available. In this blog we'll focus on the former, we'll be building a Show Ticket REST service and deploy it to Heroku. Our goal is to show how quickly you can make an Akka app that not only does something nontrivial, but is built to scale even in its easiest, early incarnations.
Without further ado let's get into coding :)
Setting up the project
I'll be using IntelliJ as my preferred IDE, you can go ahead and use any IDE of your choice to write the Scala code. Make sure you have sbt installed in your PC, please note that Akka 2.5.12 requires Java 8 or higher. If you've installed an earlier version of sbt, please make sure to remove it and upgrade to a version 1.1.6 or higher.
sbt installation instructions:
For Mac users: https://www.scala-sbt.org/release/docs/Installing-sbt-on-Mac.html
For Windows users: https://www.scala-sbt.org/release/docs/Installing-sbt-on-Windows.html
For Linux users: https://www.scala-sbt.org/release/docs/Installing-sbt-on-Linux.html
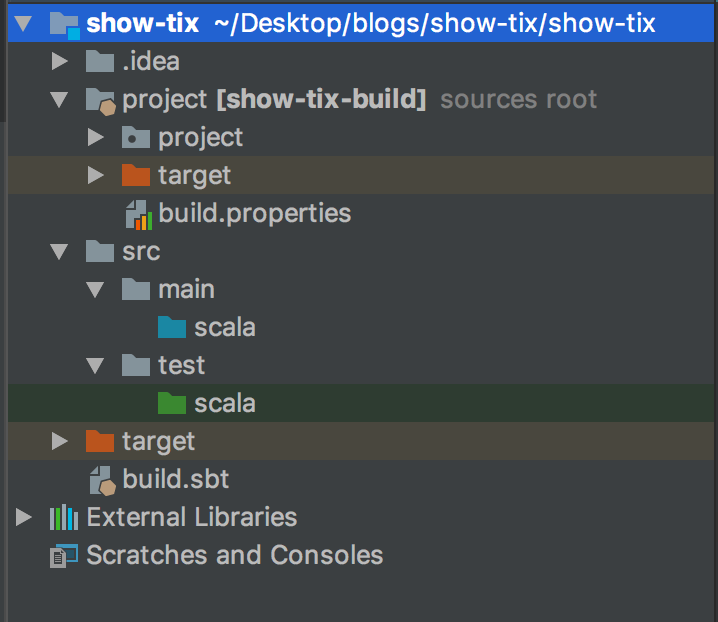
To create a new sbt project go to: File > New > Project, then select sbt and click Next, let's call our project show-tix. You should see sbt booting up, getting all dependencies. Now that we've verified the project builds correctly, you should have a folder structure like so:
The sbt build file (build.sbt)
We're using the simple sbt DSL for build files in this blog because it gives us what we need right now. The build file is located directly under the show-tix directory in a file called build.sbt.
We'll add some library dependencies in the build file like this:
                      name            := "show-tix"              version              := "0.1"                          scalaVersion              := "2.12.6"                          organization              := "com.showtix"                          libraryDependencies              ++= {
              val              akkaVersion = "2.5.12"
              val              akkaHttp = "10.1.1"
              Seq(
              "com.typesafe.akka" %% "akka-actor"      % akkaVersion,
              "com.typesafe.akka" %% "akka-http-core"  % akkaHttp,
              "com.typesafe.akka" %% "akka-http"       % akkaHttp,
              "com.typesafe.play" %% "play-ws-standalone-json"       % "1.1.8",
              "com.typesafe.akka" %% "akka-slf4j"      % akkaVersion,
              "ch.qos.logback"    %  "logback-classic" % "1.2.3",
              "de.heikoseeberger" %% "akka-http-play-json"   % "1.17.0",
              "com.typesafe.akka" %% "akka-testkit"    % akkaVersion   % "test",
              "org.scalatest"     %% "scalatest"       % "3.0.5"       % "test"
              )
}
The libraries are downloaded from a set of predefined repositories, including a Lightbend repository that hosts the Akka libraries that we use above. Every dependency points to a Maven artifact, in the format:
organization % module % version Note: Lightbend was formally Typesafe hence the package names.
The %% is for automatically using the right Scala version of the library. The most important module here is the akka-actor module. We can compile the code on the terminal by running:
sbt compile Now that we have the build file in place, let's take a closer look at what we are trying to achieve.
REST service
Our show-tix service will allow customers to buy tickets to all sorts of events, concerts and the like.
The requirements for the REST API are shown below:
App structure
Actors can perform four operations: create, send/receive, become and supervise. We'll only touch on the first two operations and also take a look at the overall structure: how operations will be carried out by various actors to provide the core functionality of our service — create events, issuing tickets and finishing events.
The app structure:
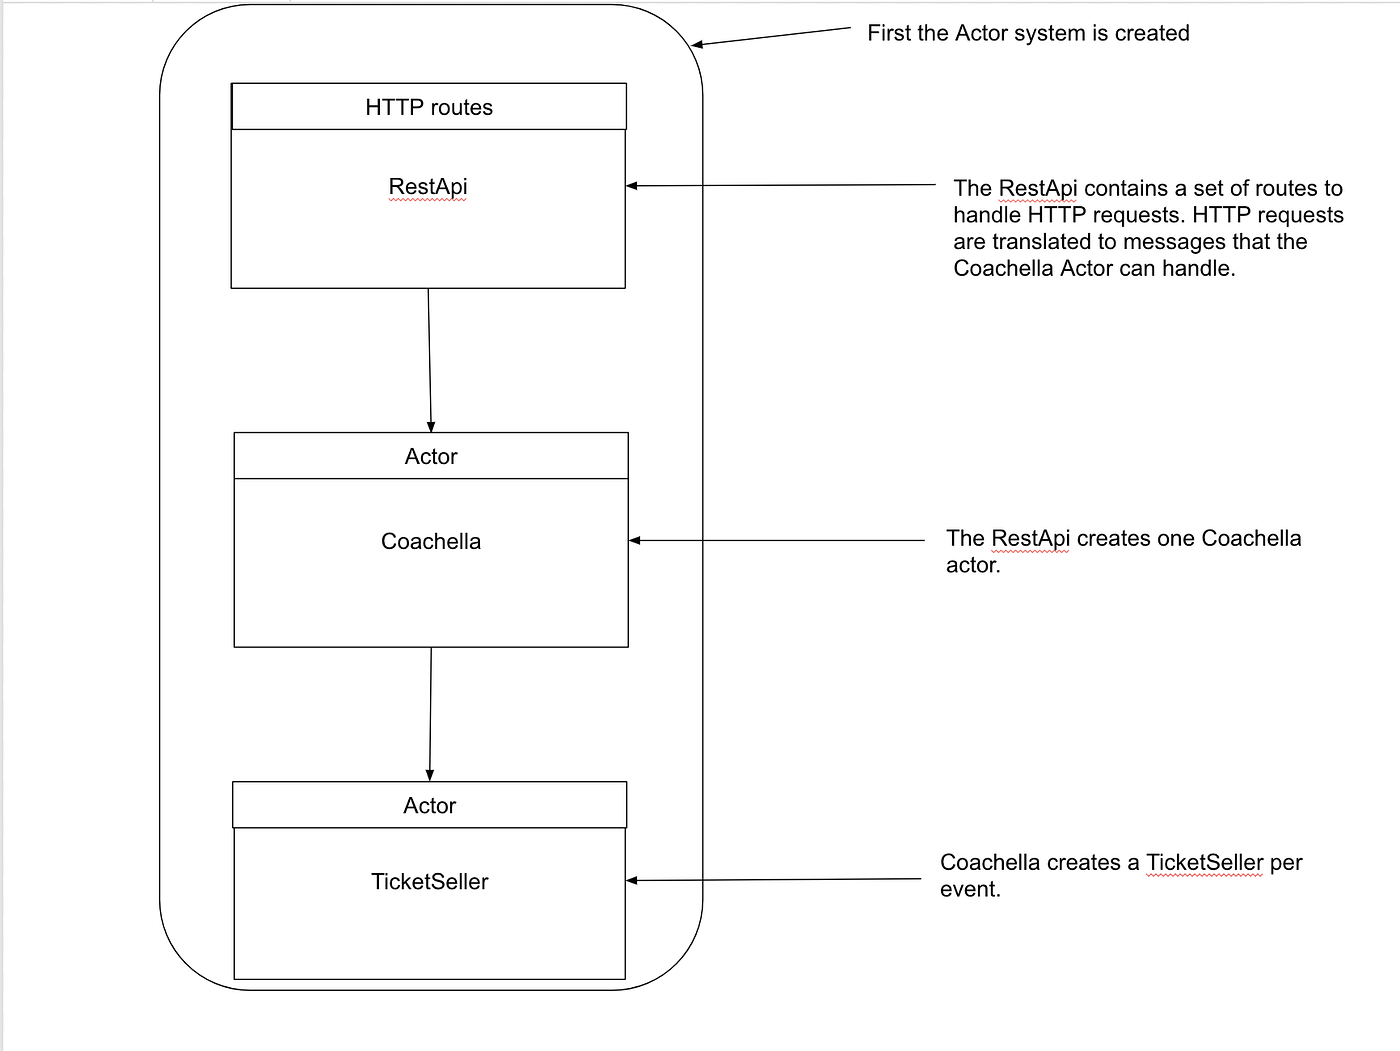
The RestApi is basically an adapter for HTTP: it takes care of converting from and to JSON and provides the required HTTP response. The TicketSeller eventually keeps track of the tickets for one particular event and sells the ticket.
Let's create a folder under src/main/ and call it resources there's where we'll have all our configuration files and other resources.

Inside the resources folder we'll add an application.conf file and a logback.xml file.
application.conf has config values that can be parsed in other files on the app by using the ConfigFactory, we'll see the use cases for this soon. We also have a logback.xml file which enables us to log application actions on the console. Now that we have our config values set let's create the ActorSystem (view img 1.1).
We'll create a new package under src/main/scala and call it com.showtix. Scala uses packages to create namespaces which allow you to modularize programs. Inside our package lets create a new scala file and call it ServiceMain.

The ServiceMain object extends App like any Scala application. The ActorSystem is active immediately after it has been created, starting any thread pools as required.
The actor in the app communicate with each other through messages. The messages that an actor can receive or send back on a request are bundled together in the actors' companion object. We have two actors in this app (view img1.1), let's create the messages for the two.
Messages
We'll start by creating a new package inside com.showtix and let's call it messages.

Create two scala files inside messages and name themCoachella.scala and TicketSeller.scala respectively.
As you've seen so far we have an interface that revolves around the lifecycles of the core entities: Events and Tickets. All the messages are immutable, since they are case classes or objects.
The Actors have to be designed to get all the information they need, and produce all that is needed. This lends itself well with REST.
Actors
As seen from img 1.1 Coachella 🎡 creates TicketSeller which simply keeps a list of tickets. We'll start from the TicketSeller actor and work our way up. Let's create an actors package under com.showtix and addTicketSeller.scala and Coachella.scala
Note: ! means "fire-and-forget", e.g. send a message asynchronously and return immediately. Also known as tell. For more info on tell and ask have a look at this discussion on Stack Overflow . We'll be looking at a use case of ask shortly.
The TicketSeller actor keeps track of the available tickets using an immutable list.
An actor is always created from a Props object. The Props object describes how the actor should be created. You can find more info on Props here .
We are going to define a props method inside the TicketSellermessages object like so:

The parent actor (Coachella)
One important aspect in Akka's architecture is the parent-child relationship 👩👦. Parents supervise their children and handle exceptions. Who's the parent of the TicketSeller actor we just created? Yes! It's Coachella (see img 1.1). Typically, you create a child actor by calling the context.actorOf method. — This injects the new actor as a child into an already existing tree: the creator actor (Coachella) becomes the parent 👩of the newly created child actor (TicketSeller) 👶:
Inside actors/Coachella.scala let's add this code:

The Buy message is forwarded to a TicketSeller. Forwarding makes it possible for Coachella to send messages as a proxy for the RestApi. The response of the TicketSeller will go directly to the RestApi. Note that we've introduced ActorRef — ActorRef carries the message that should be sent to an Actor.

Futures are important asynchronous building blocks that create an opportunity for parallel execution. ask is an asychronous operation and it returns a Future.We don't want to wait and block Coachella from handling other requests.
self.ask(GetEvent(child.path.name)).mapTo[Option[Event]] asking GetEvent returns a future reference of Option[Event]. So when mapping over all TicketSellers we'll end up with an Iterable[Option[Event]] (see the return type of getEvents ).
                      def            convertToEvents(f: Future[Iterable[Option[Event]]]) = {
            f.map(_.flatten).map(l ⇒            Events(l.toVector))
}
The convertToEvents method flattens the Iterable[Option[Event]] into an Iterable[Event] i.e: f.map(_.flatten), leaving out the empty Option result. It then transforms the Iterable into an Events message i.e: .map(l => Events(l.toVector)).
pipe(convertToEvents(Future.sequence(getEvents))) to sender() We then send the Events message back to the sender once all responses have been handled, by using another pattern, pipe, which makes it easier to eventually send the values inside futures to actors.
If you run sbt compile the program won't compile, error:

What happened? 😱As you can see we need an ExecutionContext in order to be able to use a Future. Let's import ExecutionContext
import scala.concurrent.ExecutionContext.Implicits.global and compile the program again:

Success! So why did ExecutionContext do the trick? This is because when we used Future.sequence(.... we called the method apply on the Future companion object.
          object Future {
            def            apply[T](body: =>T)(implicit            @deprecatedName('execctx) executor: ExecutionContext): Future[T] =
            unit.map(_ => body)
}
So, apply takes a by-name parameter body and an implicit ExecutionContext. Then it calls map on Future.unit.
Now that we've tackled the most important bits of Coachella 🎡 let's have a look at the RestApi.
HTTP Routes (RestApi)
The RestApi will use Akka HTTP routing DSL , I'd recommended reading through Routes and Directives so that you can have a good understanding of the routing structure in Akka. Basically, the RestApi is a HTTP adapter and it's going to have endpoints which send and receive messages (view gist 1.0).
Since we are just creating an Event and then selling the Tickets to it, our routing requirements are few at this point. The RestApi defines a couple of case classes that it uses to convert from and to JSON (we'll use Play Json for this). Usually you don't need to traverse JSON AST directly. Play JSON comes equipped with some convenient macros to convert to and from case classes.
Let's add a new file under the messages package and name it EventMarshaller.scala.
Now that we have our messages, let's look at the details of routing. We'll create a new package under com.showtix and name it routes i.e:

Inside routes add a new file called RestApi.scala and add this code:
RestRoutes uses a CoachellaApi trait, which has methods that wrap the interaction with the Coachella actor so that the route DSL code stays nice and clean.
On line 20 we have system.actorOf(Coachella.props), the RestApi implements the createCoachella() method to create a Coachella child actor.
Remember our ServiceMain.scala file? We'll bind the routes defined in the RestApi to the HTTP server . Our updated ServiceMain.scala file will look like this:
The RestApi (on line 22) provides the routes which are passed as a Future through Http().bindAndHandle() when the server is started. Http() returns the HTTP extension. bindAndHandle is an asynchronous method that returns a Future before it has completed.
The RequestTimeout trait makes it possible for the RestApi to use the configured request timeout in akka.http.server.request-timeout, read more about Timeout here.
To start the app we'll run sbt run on the terminal.
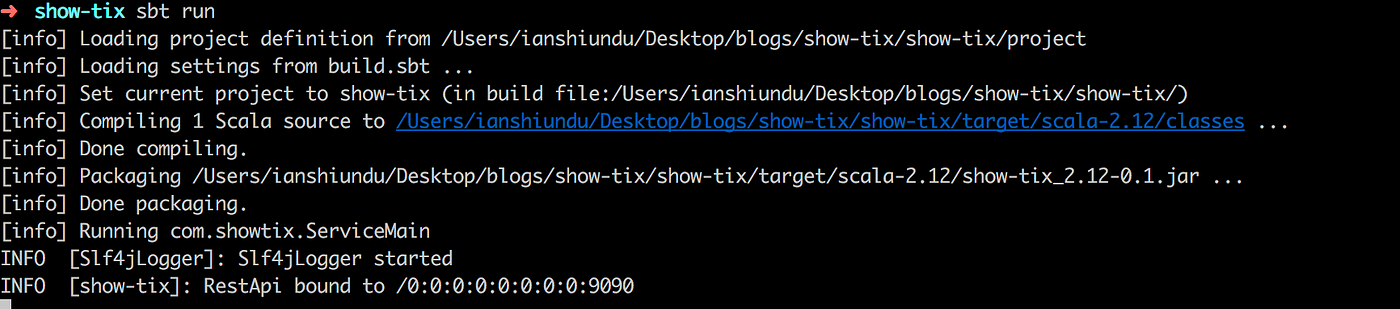
Our HTTP server is started and listens on port 9090. Now let's see if we can create an event with a number of tickets! I'll be using Postman to make the request.
POST show-tix/v1/events/event_name 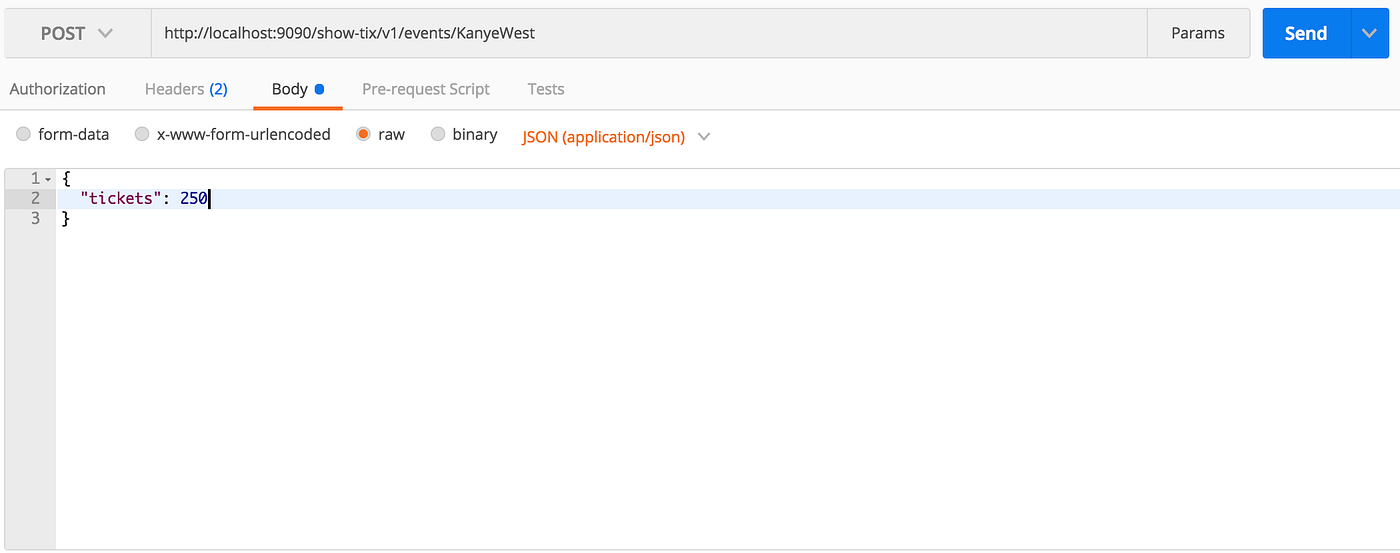
Content-Type: application/json
Response:

The event is now created. Let's finish up the other routes as well. Here's how the RestApi looks like now:
Now that we have all the routes we need, let's try them out!
Creating an Event
POST show-tix/v1/events/event_name We'll start by creating 2 events:
Requests:


Response (201 Created):


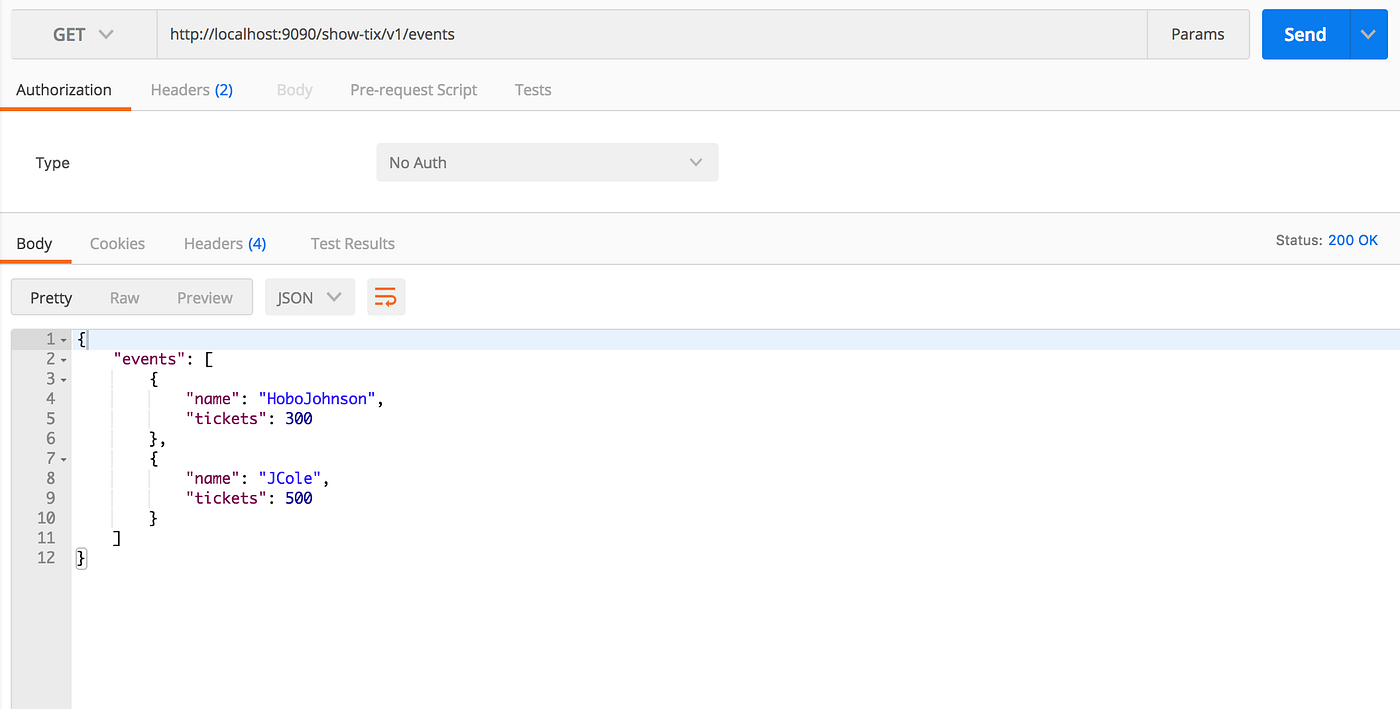
Requesting a list of all events
GET show-tix/v1/events Response (200 Success):
Purchasing 30 HoboJohnson tickets
POST show-tix/v1/events/:event/tickets Request:

Response (201 Created):
          {
            "event": "HoboJohnson",
            "entries": [
            {
            "id": 1
            },
            {
            "id": 2
            },
            {
            "id": 3
            },
            {
            "id": 4
            },
            {
            "id": 5
            },
            {
            "id": 6
            },
            {
            "id": 7
            },
            {
            "id": 8
            },
            {
            "id": 9
            },
            {
            "id": 10
            },
            {
            "id": 11
            },
            {
            "id": 12
            },
            {
            "id": 13
            },
            {
            "id": 14
            },
            {
            "id": 15
            },
            {
            "id": 16
            },
            {
            "id": 17
            },
            {
            "id": 18
            },
            {
            "id": 19
            },
            {
            "id": 20
            },
            {
            "id": 21
            },
            {
            "id": 22
            },
            {
            "id": 23
            },
            {
            "id": 24
            },
            {
            "id": 25
            },
            {
            "id": 26
            },
            {
            "id": 27
            },
            {
            "id": 28
            },
            {
            "id": 29
            },
            {
            "id": 30
            }
            ]
}
GET after 30 tickets have been purchased
Response (200 Ok):

Result after trying to buy a sold out Event
Response(404 Not Found):

That concludes all the API calls in the REST API. Clearly, at this point, the application supports the basic Event CRUD cycle, from creation of the actual Event through the sale of all tickets until they are sold out. If you followed along or even tried to build this yourself, congratulations! You've seen how to build a fully asynchronous Akka actor app with a fully functional REST API. While the app itself is rather trivial, we've already made it so that processing is fully concurrent. This blog also showed how you can do asynchronous processing within the synchronous request/response paradigm of the HTTP world. Let's look at deploying this app to the cloud.
Deploying to Heroku
Heroku is a cloud provider that has support for Scala applications, and free instances that you can play with. I'd expect that you've already installed the Heroku toolbelt. If not please have a look at the installation instructions here. Also make sure to sign up for an account on https://www.heroku.com/.
We'll first create an app on https://www.heroku.com/. After that we'll deploy it and run it.
Creating an app on Heroku
Before we create the app, make sure you have your changes upstream or have a Git repository for this project. Once we actually deploy to Heroku, you'll see that all subsequent pushes to the cloud instances are accomplished directly through Git, by simply pushing the desired version of the source to our remote instance. We'll start by logging into Heroku on the CLI. Execute the following command in the show-tix directory:
heroku login We need to add a couple of things to our project so that Heroku understands how to build our code. We'll first create a new file under project directory and call it plugins.sbt.
sbt-assembly uses assembly to create one big JAR file, needed for deployment to Heroku.
sbt-native-packager uses the packager to create start up scripts for running the app on Heroku. To add some more features i.e autostart support when running your application as a service on a server, we'll add this line on top of our build.sbt.
enablePlugins(JavaServerAppPackaging) 
We'll also need a Procfile under the show-tix directory, which tells Heroku that our app should be run on a web dyno — one of the types of processes Heroku runs on its virtual dyno manifold.
Procfile:
Procfile specifies that Heroku should run the Bash script that the sbt-native-packager plugin has built.
Let's first test our app to see if everything runs locally:
Run sbt clean compile stage on the terminal. What this does is that it cleans target, then builds our archive but doesn't deploy .
Then run heroku local to tell Heroku to grab archive and start up our app locally.

Heroku manages to load our app and you can now access it on localhost:5000.
This is all that's required to prepare an application for deployment on Heroku. It let's us go through the whole cycle locally so that we are going at maximum speed while getting our first deploy done.
Now let's create our Heroku app! Execute heroku create:

You should see something like this, I'll rename my app to show-tix instead of agile-springs-12757 by executing: heroku apps:rename show-tix.

That's more like it!
Deploying on Heroku
We've just verified that we could locally run the app with heroku local. We created a new app on Heroku with heroku create. The command also added a git remote with the name heroku to the Git configuration. All we have to do now is to make sure all our local changes are pushed upstream to the Git repository. Once you've pushed your changes, will push the code to Heroku with the following command:
git push heroku master 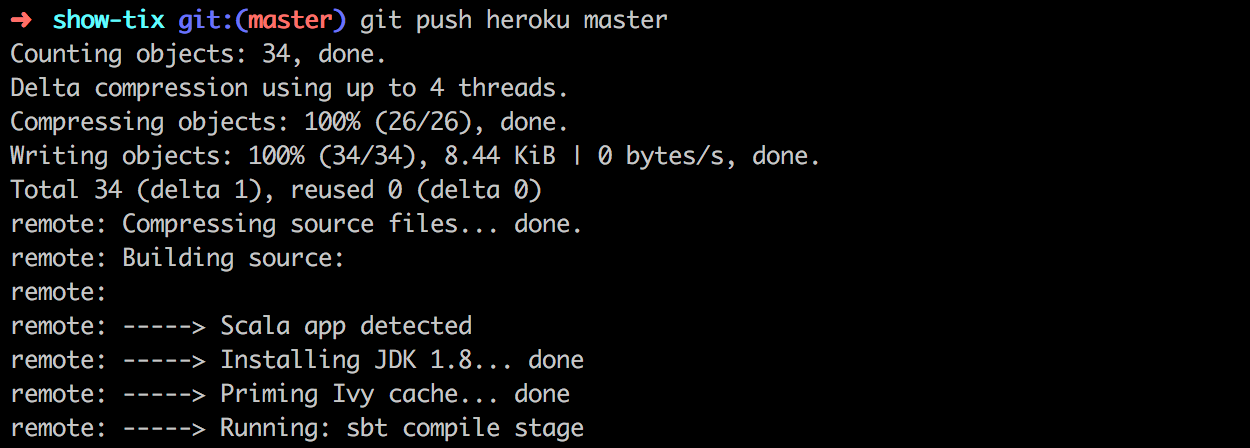
Heroku looks into the Git push process and identifies the code as a Scala app. It downloads all dependencies on the cloud, compiles the code, and starts the application. Note that Heroku figured out that our app is a Scala app, so it installed the OpenJDK, and then compiled and launched the source in the instance. The app is now deployed and started on Heroku.
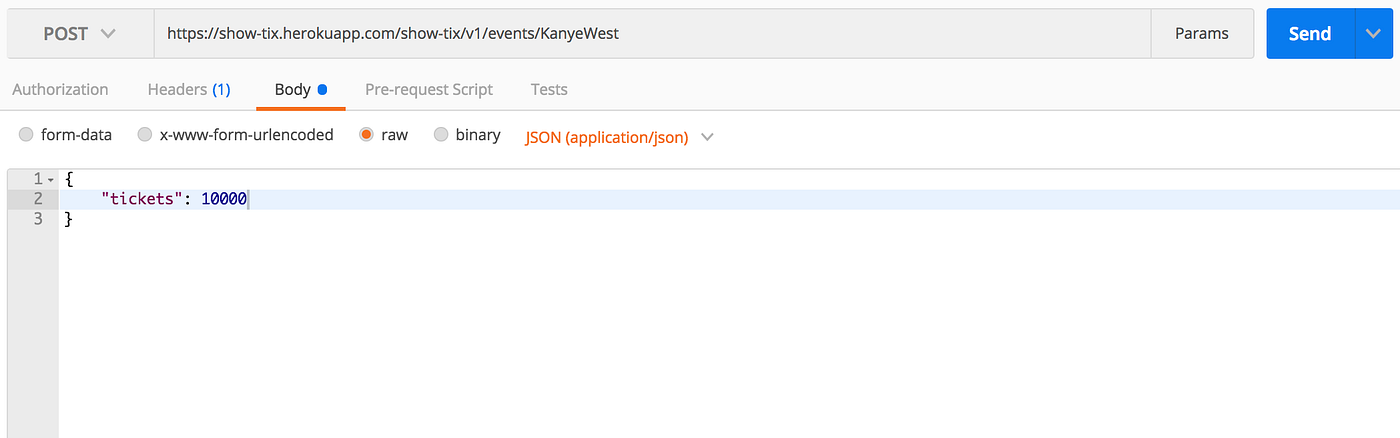
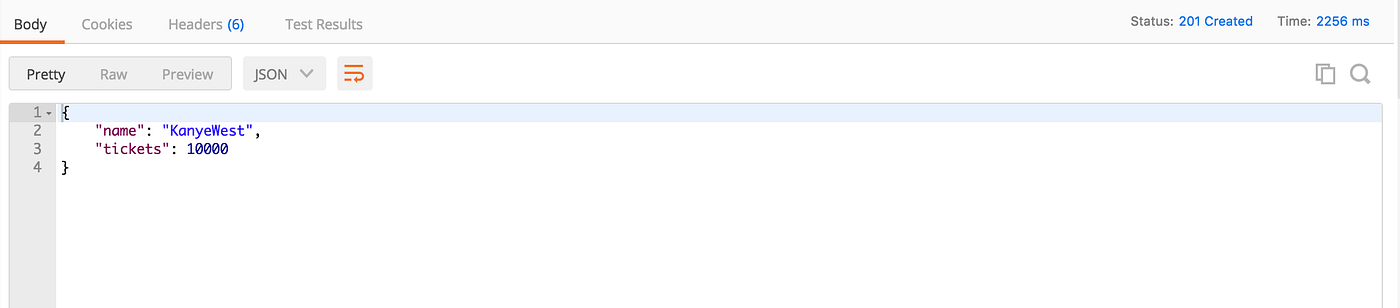
I'll use Postman to test the app again on Heroku:
Request:
Response:
You can find the show-tix repo here.
Congratulations, you just deployed your first Akka app to Heroku! With that, we conclude this iteration of the ShowTix.com app. Now that the app is deployed on Heroku, you can call it from anywhere.
There's no persistent storage for tickets. We've deployed to Heroku, but web dynos can be replaced at any time, so only storing the tickets in memory won't work in real life. The app is scaled up but has not scaled out yet to multiple nodes.
I hope you got excited about what a quick, out-of-the-box experience Akka offers 😉. Chao chao!
More resources:
Akka In Action: https://www.manning.com/books/akka-in-action
Futures: https://www.beyondthelines.net/computing/scala-future-and-execution-context/
Pipes and Filters: https://www.oreilly.com/ideas/implementing-the-pipes-and-filters-pattern-using-actors-in-akka-for-java

Source: https://medium.com/@ian.shiundu/building-a-fully-functional-rest-service-using-akka-actors-8b5c12978380
0 Response to "Akka Rest Service Example Java"
Post a Comment